Rather than a comprehensive list of notation rules, most of which can be found in the usual texts (Gould, Read, Stone, etc.), this is a short list of specific guidelines I believe composers should follow and all too often do not. My opinions are based on 25+ years of experience conducting contemporary ensembles, especially the Indiana University New Music Ensemble (since 1992) and from playing trumpet in numerous ensembles. A few more key suggestions for notation can be found at the IU Jacobs School of Music Composition Department Music Notation Style Guide.
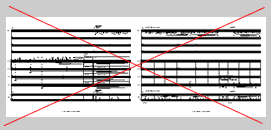
1. Never, ever, EVER make Scores or Parts in LANDSCAPE Orientation (especially with 11x17!).
Landscape scores fall off stands, necessitate unwieldy, even theatrical page turns, often require two stands, and simply look unprofessional. Remember that once a portrait-oriented score is opened, it is wider than it is tall, so opening a landscape score makes for a doubly wide document.  |
|
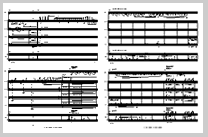
Format all Scores and Parts in PORTRAIT Orientation.
Portrait orientation is the professional publishing standard. Sometimes composers use landscape because they think it fits the ensemble size better; in such cases, composers should simply format for two or more systems on each page.  |
NOTE 1: One possible exception to this is for piano music, though portrait is still better.
NOTE 2: Another exception is for jazz ensemble scores, which are commonly in landscape on 10x13 or letter size; avoid 11x17.
NOTE 3: Composing on landscape manuscript paper (11x17) is a different matter and highly recommended - just don't 'engrave' your final scores in that format!
2. Print Parts on 10x13 PAPER.
Yes, I know this is not a stock size, but you can easily order it or cut it down from 11x17 yourself. 10x13 is the best size for parts, and is the required size for some professional ensembles, including the Minnesota Orchestra. Here are some ways to print on 10x13.
First, format and edit your music in Finale or Sibelius knowing you will end up printing on 10x13, so size the music accordingly.
Second, If you have access to a printer that can accept 13x20 paper, order your paper of choice from a supplier like Xpedex, having them cut it to 13x20 for you. The paper type should be "offset", 60# or 70#, "text," preferably a light natural color, not too dark and not white. One paper I like is Cougar Natural 70# Text Offset.
If your printer won't take 13x20, order the paper cut to 10x13 and use this in either your printer or a photocopier. In a pinch, just cut down some white 11x17 stock yourself.
BEST:
- Print two pages per side on 13x20 paper, fold and staple in center (or cut and bind for larger documents).
4 page document:
print 4&1 / 2&3
8 page document: print 8&1 / 2&7, 6&3 / 4&5
12 pages: 12&1 / 2&11, 10&3 / 4&9, 8&5 / 6&7
etc.
- Or, print one side per page onto 10x13
GOOD:
- print originals on letter size paper, and photocopy at 117% onto 10x13 paper (fed through "bypass" feeder).
- Or, print originals on tabloid (using just 11x14 of the paper), and photocopy at 92% onto 10x13 paper.
NOTE: 11x14 is second best (though it doesn't fit well in folders), 8.5x11 is third best (make sure the music is not too small).
EXCEPTION: For short pieces or pieces you'll be photocopying large runs of (perhaps for band, for example), it can work well to format for letter size, print "2 up" onto tabloid (print pages 4&1, then 2&3 on the back side), fold, and staple if the part is more than 4 pages (requiring more than one sheet of 11x17).
3. BIND all Scores and Parts properly.
Absolutely never hand out loose sheets that can easily fall off stands, or get out of order.
BEST for parts and thin scores:
- Stapled in center. Get a large stapler to make this easy.
BEST for thick scores:
- Coil. Note - buy coils that are long enough. Do not use 11" coils on 17" scores.
GOOD:
- Tape. Works for parts, rarely for scores. Use a flexible tape, like medical tape or duct tape (!). You can buy a "tape binder," but they are overpriced, IMHO. You can also learn to stack the pages, sort of bend them back and forth to fan the pages out, lay down on flat surface, and tape. The fanning out makes the tape reach each page. Also, this should be done so that the next page that needs to be turned is sticking out a bit.
WORST:
- Comb. Can work, but is not allowed by groups like the Minnesota Orchestra. Noisy...easily damaged...doesn't fit in folders well. If you must use comb, don't use 11" combs for 17" scores and don't overlap combs. Order combs that are long enough.
EVEN WORSE:
-Stapled on the side. Documents don't lay open flat. | |
4. Plan PAGE TURNS CAREFULLY, on odd pages (1, 3, 5...).
While in RARE cases it might make sense to start a part on the left side page, with the first page turn on 2, this should be avoided in preference for the professional publishing standard of a right hand page start. There is no reason to begin a score with a left page.
a) Page Turns are more important than saving paper. Plan page turns where there is plenty of time, even if it means having just one or two systems on a page.
b) Instrumentalists should not have to play immediately following a page turn. In other words, try to have bars of rest either side of a turn. (No surprises!)
c) Place a warning (V.S.) when a quick page turn is necessary.
d) A finished part does not require a player to photocopy because page turns were not accounted for. Solve the problem before you hand the part out, either with formatting, or if absolutely necessary, a fold-out.
5. Use MEASURE NUMBERS well, preferably in the following four ways:
a) At the start of every system
b) At structural points ("rehearsal numbers"). Rather than letters, I find using the actual measure number, preferably in a larger font, to be the best way to indicate rehearsal landmarks. Just one counting system to deal with, and rehearsal spots are quickly found.
NOTE: ALL PLAYERS should have these numbers, so make sure to break multi-measure rests at these points.
c) At barlines following all multi-measure rests.
d) Sprinkled liberally throughout the part, especially toward the right side of systems, where it might take some time counting to find certain bars in rehearsal. After a part is edited and formatted, go through it once, adding measure numbers where appropriate.
NOTE: Never use the system of placing measure numbers every 5 or 10 bars. This breaks up multi-measure rests into un-musical divisions.
6. CUES - Use them.
7. BARLINES
a) Use Double Barlines to indicate sudden changes of tempo - both isolated changes and strict tempo modulations (quarter = dotted quarter).
b) It can be helpful to use (single) Heavy Barlines to indicate phrase divisions, or groupings of bars. An example would be in a fast piece conducted in one, where measures are flying by. A thick barline here and there relating to the musical phrasing will help players not get lost.
8. TEMPO
a) Use metronome speeds for tempo indications (not simply "Allegro").
b) Use only one number, not a range, unless the tempo is supposed to be in flux, speeding up and slowing down within a range.

NOTE:
Neither a or b overly restricts players, who, as human beings, will approximate tempo, and vary as necessary depending on the situation (acoustics, etc.). Giving precise tempo indications is particularly important in works with a variety of tempi, as the relationship between different tempi is then clear. Musicians will appreciate the clarity of intent.
c) Use numbers found on analog metronomes: 40, 42, 44, 46, 48, 50, 52, 54, 56, 58, 60, 63, 66, 69, 72, 76, 80, 84, 88, 92, 96, 100, 104, 108, 112, 116, 120, 126, 132, 138, 144, 152, 160, 168, 176, 184, 192, 200, 208; musicians are familiar with these tempi. Avoid speeds like 113, unless a precise tempo modulation gets you to that somehow.
d) Express tempo (and meter) in terms of the duration that will be conducted or felt as the pulse.

Exception: when the meter doesn't clearly express the pulse (5/8, 6/8, 7/8, etc. conducted or pulsed in quarters and dotted quarters.)
9. METER
a) Use Meters of 2, 3, 4 beats for the most part. Sometimes 5. Avoid large meters of 6, 7, 8, 9, or more beats in a bar. These are usually broken down into twos and threes anyway, and the downbeat is easily confused.
b) In irregular meters (5/8, 7/8, etc.), make sure the divisions (2+3, 3+2+2, etc.) are clear and in agreement in all parts through use of rests and durations, including tied notes where necessary [NEVER use a half note in 5/8!]. If you use an irregular meter with a consistent division, whole rests are fine in empty measures; if the division changes much, it is best to show the division by using appropriate rests in empty bars.
c) see 8d
10. Never, ever, EVER make scores or parts in LANDSCAPE Orientation.
Last updated:
06-Mar-2018
Comments: dzubay@gmail.com
© Copyright 2007, David Dzubay |